
HDYDI: DIY A Sweet Prayer Box
Y’all spoke, I listened.
I wouldn’t necessarily put myself in the crafty box, but I am creative. We have a fair amount of hoarders in our home, namely all the children under 13. Rather than try to stealth throw away all their stuff, we decided a religious prayer box might do the trick with all those medals, prayer cards, rosaries and other bits and bobs. If you’re looking to create a box for your kids, or for a class project, this is your 411.
I’ll dish on what worked (and what didn’t) when we tried our hand at it. And, in this case, I’ve created 156 boxes. Yes, you read that correctly.
Time to get your paint on, y’all!

The Supplies
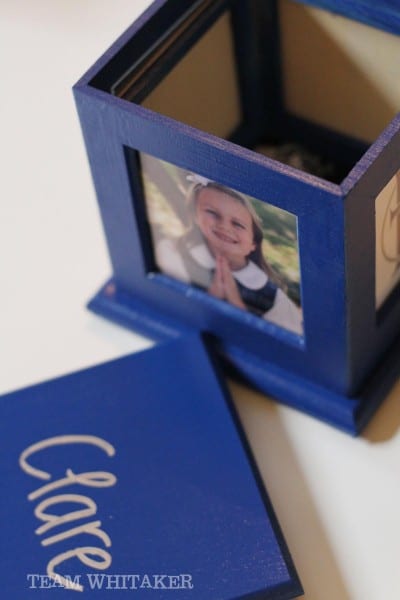
Wooden box. We purchased ours at Michael’s. In the last several years they’ve changed their ordering practices, so what used to be a special order with the store manager is now just done online with a click. They keep changing their boxes (grrr) but we’ve looked for one with at least one opening for a photo. The box, shown above, retails for $4.99, but when you’re doing many of these (say 52!) you have to find ways to save money. Pro tip: Contact your store manager PRIOR to purchase to see if he will give you a percentage off because you’re ordering in bulk for a worthy fundraising cause. We had to purchase ours outright through the online store, but I took in my receipt and not only did the store take 30% off the entire order, but they waived tax because we had our school’s Tax ID number handy. I can’t say enough good things about Mark at the Lakeline Store in Austin.
Spray paint. The first 104 we did, we painted by hand. God bless America that was time consuming. This year? This year, we got smart and spray painted them. We just laid out a tarp on our front driveway on a pretty afternoon and got to painting. The boxes got two coats and the lids got two coats on the top and one coat on the underside. Pro tip: Buy more cans than what you think you’ll need, that way you don’t have to go back to the store multiple times. For 52 boxes, we used six cans. Also, bribe your husband. Mine turned out to be a stellar painter!
Spray paint trigger. Make your life one-million times easier and get a trigger. Not only did the paint go on smoother, but without cramping a finger. Pro tip: Wear gloves if you don’t want to wear that paint for a few days.
Sharpie marker. We’ve used paint pens and sharpies and I definitely prefer sharpies. Let the paint cure a couple of days before attempting to add a name to the box. Get a class listing of names from the teacher and any names you’re unsure about? Call the parents. Pro tip: Buy two markers, especially if you’re writing more than 25 names as the pen tends to lose some of it’s ink because you’re writing directly onto paint. I also typed out the names in a font I loved so I just copied the writing from there. My favorite font? Jenna Sue.

Felt. This is for the inside of the box and provides a nice soft spot for all those bits and bobs to land. Pro tip: Buy the felt in a big 36″x36″ square, tons cheaper, and cut a template.

Scissors. This one’s obvious.
Elmer’s glue. We tried hot glue for the felt and found that Elmer’s works much better. A little goes a long way.
Photos. These took some timing. Because these were created for a Catholic school, we opted to take photos of the kids on a Mass day so the uniforms were consistent. The weather is always tricky. Pray for it. Make sure you know the orientation and size of the photo opening on the box as this determines what way to shoot your photos, vertical or horizontal. Because the box above is a 3″x3″ opening, I took vertical photos and then went into PhotoShop and placed two photos (side by side) on a 4×6 template. That way, when they were sent back from the photo shop, I just had to chop off that bottom inch and then cut in half. I hope that makes sense. You can probably do the same thing in Elements or PicMonkey. For awesome photo printing, my go-to shop is MPix. Great quality and they often run online sales, many times including free shipping! Pro tip: Enlist some assistants to move the kids along, ensure you don’t forget anyone and serve as “hair stylist” to the stars for stray hairs, wonky glasses and untucked shirts.

Depending upon the box you choose, other photos/artwork. Some years, we’ve had boxes with more than one spot for a photo. We’ve had the kids draw photos of the patron saint for the school, using clip art as a guide. That way, all the drawings are somewhat consistent. We simply cut cardstock to fit the space and then cut a few extras in case kids made a mistake. The teachers were able to facilitate this activity during down time in the classroom, at their convenience. Pro tip: Be sure to have the kids write their names on the back of the drawing. Also, we had them use map pencils, rather than crayons, for better drawing definition. I know, I’m a picky artist.
Religious medal/FC rosary via Autom. Because these are prayer boxes, we wanted to start our kids off right, so we included a First Communion rosary and saint medal. In year’s past, we’ve also included prayer cards. Really, the sky is the limit. Just make sure you don’t fill it up for them! Oh, and make sure to get all those religious items blessed BEFORE you place them in the boxes. Otherwise, carrying 52 boxes up to the church gets a tiny bit tricky. (Not that I would know.) Pro tip: We opted to order these items online via Autom. While we have a Catholic bookstore in town, for the quantities we were purchasing it just wasn’t cost effective. Shop around for the best deal.
After you create these lovelies, it’s time to encourage parents to purchase one to support your school! We created a simple flyer that had a few photos of the boxes, along with donation information. We sent home a hard copy and emailed it out. We always suggest an amount – only you know what’s feasible for your school community – and then leave it up to the family’s to decide the amount. And, yes, everyone gets a box! In total, we typically raise a little over $2,000 a year making these and it costs about $200-250. Not a bad return and it’s such a beautiful way to raise money for a cause you love.
Function + a good cause. I love it.
After all the donations came in, we placed them in paper sacks, took them to school and the kids took them home. I wish I could convey just how much I love this project. It is work, but boy is it worth it. All four of my older ones now have a prayer box and they use them all the time.
Happy painting and praying!

I love love love our prayer box from Emma’s class!
Oh, Lisa, you are so sweet. I’ve loved making every one!
What an awesome fund raiser! And it would be so neat to have a box from each year each child was in school!
Girl, you are brave! Six classes of boxes will be enough for me 😉 But, I’m happy to pass along the torch!
Thank you so much for sharing this tutorial! Looking forward to making our own. Have a great weekend!
I love this idea!!! My daughter is in second grade and I would love to do this for her class. Would you be willing to share your flyer with me? I would really appreciate it!!
I don’t have the flyer anymore. We went electronic with Greater Giving so it’s not fancy! So sorry I can’t help.