
HDYDI: Organize Headbands
Wow. Talk about getting kicked on your hiney.
My last week consisted of one kid getting the flu, a car wreck (all are okay), a Harry Potter party (coming soon!), another kid down with the flu, the school gala and two big client projects. You know, same-same. I’m starting to catch my breath and wanted to share a project I did over the Christmas break. Later this week I’ll be sharing a very fun “before and after” of our breakfast area. And, if you haven’t already, get yourself entered for the Fr. Leo cookbook giveaway. It ends Friday, Feb. 8 at midnight.
Onto the frills.

Over the Christmas break, I realized that my girls’ headbands were mating and multiplying. It was ugly. I took to my BFFs, Google and Pinterest, and they did not let me down. There are various versions of this on the sweet interwebs, so no original ideas here. However, I’ll share how I did it in hopes that it takes some of the “learning curve” out of the equation.
Before you begin, cull the headbands. I promise you, your girls do not need as many as they have. Goodwill is completely stocked after our donation, I’m sure.
Supplies you’ll need for each headband holder:
- 1 roll of paper towels (some folks used an oatmeal container)
- 10-15 straight pins
- Fabric, 1/4 yard or so
- Sewing machine
- Round wooden base
- Wood Paint (if desired)
- Glue gun
- Flower topper

This step is easy, just head to the store (or your pantry) and pull out a paper towel roll. I tested mine first to see if the headbands would fit. The original roll was too big, so I chose a smaller one.

I had some leftover fabric in my stash. It was just a wee bit short, so I had to add a swatch and make it longer, but it was mostly hidden and no one was the wiser. Well, you are now, I guess! Be sure to wrap it with the RIGHT side of the fabric facing the paper towels. And, make sure you pin it snugly. You don’t want it moving around when the headbands are placed around it.

I just used one pin and then slid the paper towel roll out. With the RIGHT sides of the fabric still touching, pin the rest of the way down to secure the fabric. This isn’t rocket science and it doesn’t have to be perfect.

Stitch a straight line. Mine was *mostly* straight, but it won’t be winning any 4-H awards.

Once the stitching is complete, reverse the fabric and slide it over the paper towels (that seam you see is my “Aggie engineering”, so yours probably won’t look like that.) I was worried it wouldn’t slide easily, but I had no problems.

Using your straight pins, take a small piece of fabric and pin it to the inside of the roll, making your way all around. I angled my pins slightly to minimize the chance of someone getting poked. I pulled mine pretty snug. But, if you need to adjust yours, it’s easy enough to remove and start over.

Before I began sewing, I painted the base with two quick coats of white acrylic paint I had on hand. By the time I was done with the first six steps, the base was dry and ready. I got this one for under $1 at Michael’s.


While I was sewing, I plugged in the hot glue gun and it was ready a few minutes later. I glued the base first, then dry fit the flower before gluing it down.
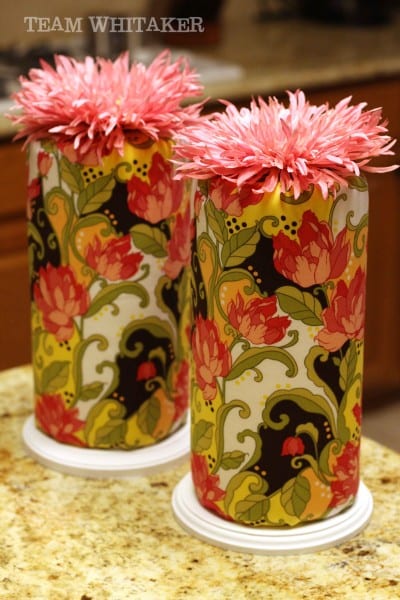
I let everything sit for about a half hour before adding the headbands. The girls were already in bed, but when the woke up the next morning, the holders were ready for use. It has been an AWESOME addition to their closets and a much better solution for organizing their growing collection.
Total cost: $6 (most of the supplies I had on hand and I’m betting you do, too)
Total time: 30 minutes
 For more HDYDI posts, visit my How I Do It Page.
Very cute! Definitely bookmarking this idea.