
{Before & After} The Garage
*This project was featured on iHeartOrganizing. Go give it a read!*
You know when you take on that massive project and have big dreams? And then reality hits and it takes you four years to finish it. Yeah, that was our garage. We’re fast like that. My buddy, Dorian, recently started a “Pinisher” series and that got me going on the last part of our garage. Here’s to a project four years in the making.
Link to Original Project: Organizing Paint and Room-by-Room Organizing
Link to My Pin: Getting a handle on your paint and garage wall organization
Follow me on Pinterest here: pinterest.com/kwhitaker96/
When we looked at the house when it was first on the market, the people that lived here before us had a kitchen out here. No. Lie. The crazier part was when we came back 48 hours later for the home inspection it was completely GONE. As in, did we just dream that? The drywall was brand new, the baseboards freshly painted and no sign of a kitchen, at all.
Some things you just don’t want to know.
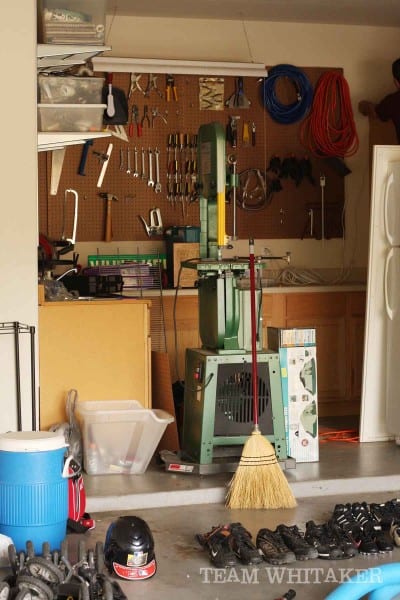
We had a blank slate, so we started by putting in the cabinets, counter, pegboard and sink. And then it sat for a year. Added some shelving. Another year. Hooked up a garage fridge donated by one of our neighbors (I know, nicest neighbors ever). One more year. Then, we finally added everything else: more pegboard for hanging, that brilliant hook system and all the vertical wall space for ladders, bikes and such. Whew. What a project. My husband’s only requirement? “Don’t make it a sissy garage. I know how you operate.”
HA! In an effort to organize but not de-man the garage, here’s what we did.
Purge
I’ve always found it ironic that folks will park their $30,000 investment outside, in the elements, and store $1,000 worth of stuff in their garage. Three days after we bought our house, a massive hailstorm blew through town and did thousands of dollars worth of damage to our vehicles. We had them parked outside and all our moving boxes were in the garage. Never again. We got serious about purging, asking ourselves if we *really* needed it or if it needed to be donated, recycled or chunked. We donated much of our old paint to a City of Austin recycling center. The saw was relocated to a better storage area and we sorted through a million pairs of shoes, lost screws and random pieces of wood. It was loads of fun. {sarcasm font}
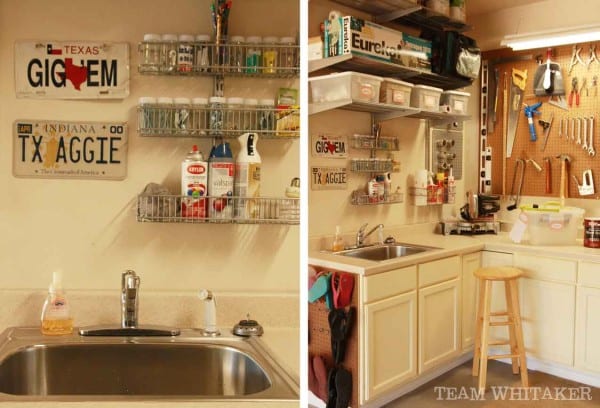
Cabinets
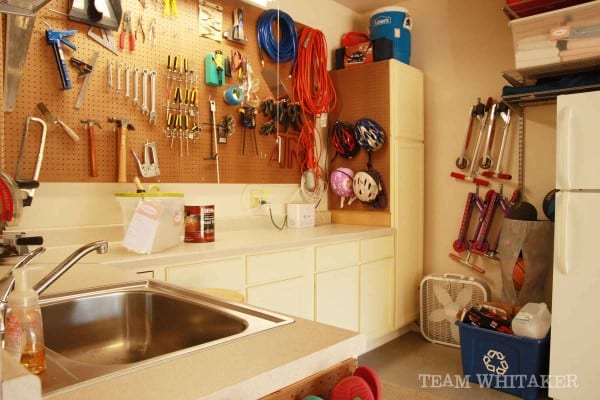
This area was originally a huge blank space. Rather than make it a hodge-podge of crazy, we bought and installed a set of cabinets. We called in the plumber to rough in the sink, but Scott did the rest. I have to say, I wasn’t fully on board with the cabinet idea, but now that they’re installed, I’m really loving the versatility. The drawers and cabinets house a variety of larger tools, a few craft supplies, plumbing odds/ends and other things that just don’t store well on a pegboard. I used some adjustable drawer dividers to make the drawers work smarter. About two months ago, we finally painted the cabinets with some leftover paint we used for our outdoor shed.

Smart Storage
We placed the things up high for either safety or infrequent access reasons, including: big coolers, paint, extra flooring and camping equipment. For balls, we got a snazzy ball holder from The Container Store (that’s where the shelving is from, too). Sitting below it is our recycle bin. That $10 box fan comes in handy on hot summer days!
Vertical Space
In every area, it’s your use of vertical space that maximizes your storage. We had two areas of the installed cabinets holding nothing. Attach some pegboard and hooks? Voila! Storage for bicycle helmets and shoes. I moved all the seasonal sports shoes to a bin with the kids’ clothes upstairs and now we just house the shoes we need, in the garage. The beauty is that the hooks can be added, moved or removed. We used a few hooks to hang their scooters on the wall, as well. I love it and so do the kids.

We employed more hooks (those are your new BFF) to hang ladders, tables, saw horses and chairs on the garage wall. On the opposite side, we store the brooms, mops and fishing rods.

Finally, as if we didn’t love pegboard enough, we used it for Scott’s most utilized tools. I’ll freely admit, he ushered me out of the garage and put all those do-dad’s in their respective places. He may not be OCD about many things, but step aside when it comes to tool organization.

A few weeks ago my husband routed out this piece of scrap wood, spray painted blue, added some clothes hooks and affixed it to the wall. We use it for sports bags and hats. Hooray for no more stinky gym bags in my house! It’s situated right by the garage door, so it’s super convenient and cuts down on the “I can’t find my ____.”

Think UP!
One of our vehicles is a four-door sedan and doesn’t sit as high as the minivan, thus giving us some garage ceiling to use for storage. Right now, it’s where the kids’ bikes reside.

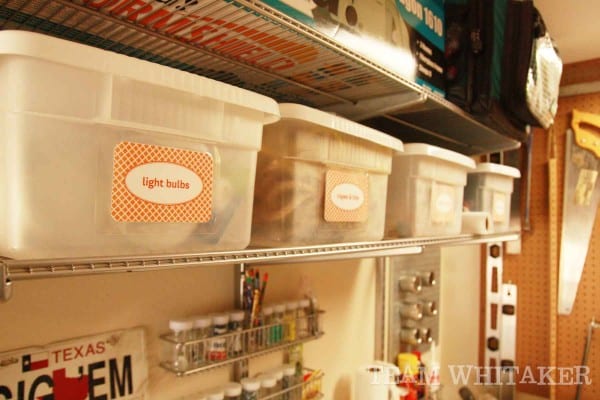
Labels
Of course. But, at the request of the man of the house, I kept these to a minimum. When I busted out the Dymo and started to label all the screws and such, I saw Scott standing in the corner shaking his head. “They’re clear, Kathryn. I can see what’s in them.” Fair enough. We used four smaller bins and labeled them: light bulbs, ropes & ties, cords & plugs, outdoor flags. Those are things we access often, but that we didn’t want in easy kid reach. The painting supplies and towels are in larger labeled bins on the other wall.
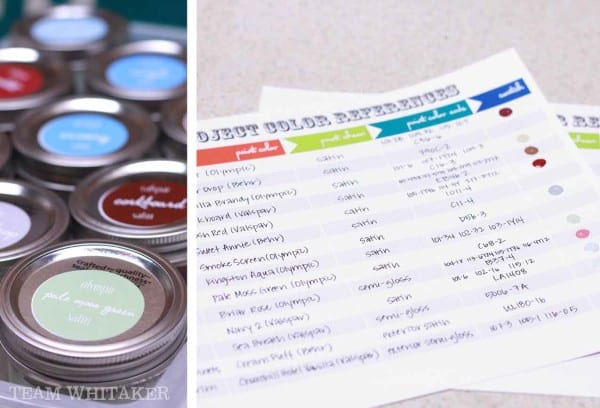
Paint Storage
For those that are paint addicts like me, myself and I, this next project will make you smile. After I saw this post on iHeartOrganizing about getting a handle on your paint, I decided to tackle it. When we purged all those paint cans, we had a bit left over from each one, so we made some “touch up” jars using Mason pint and half jars. They are tall, like asparagus, but hold more than a pint. Love them, so much.

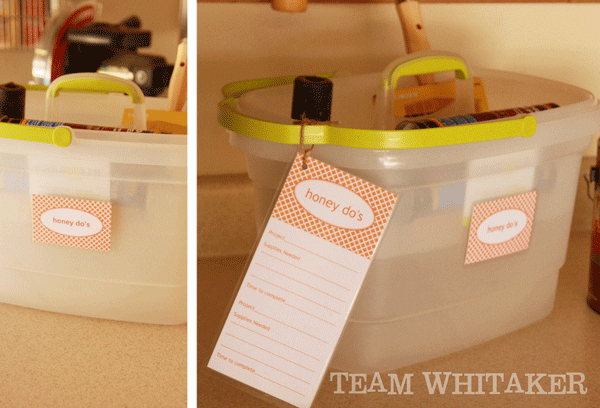
I even added a honey-do bucket to the project. My favorite part, but not Scott’s! To learn more about these easy 15-minute project, check out the honey-do bucket tutorial.
The garage, it’s pinished!
If you enjoyed this project, visit my Before & After page to see more.
See all the Pinishers this week at Scrutinies
It looks amazing!! Great job!!
We’ve thought about putting our bikes up too. How easy/hard is it for you to get them down?
Stealing the paint project & donating our excess!
The girls’ bikes are pretty easy to get down (lighter and they only hang by one wheel). Will’s bike takes Scott’s muscles. But, on the weekends, they usually stay down and we put them back up on Sunday night. So far, it’s been working great.
All I can say is “WOW!”
I wonder if the previous owners had a baking or catering business? A kitchen in the garage could possibly pass as a commercial kitchen since it would be outside of the normal living space as TX law requires.
Terri, I believe it was a cultural thing. The previous owners didn’t use the appliances in the house, only those in the garage. It was very interesting!
Kathryn, this looks terrific! That is such a good point about parking cars outside the garage so as to store stuff in it. We should take that to heart – at least park ONE of the cars in the garage, for crying out loud.
We have a detached garage so it’s not really on the way into the house. I finally just gave up on keeping the side entry door (the one we actually use) uncluttered and put a ton of hooks, crates, and a shoe organizer there. It’s cut down on random stuff being left around the house but it sure would be nice if we had a mudroom or something where these things could reside.
I dream of a house with a mudroom. Someday. But, for now, the hook system by the garage door entrance to the house is working beautifully!
You should Check out Rough Rack 4×4 Tool Racks. They will hold SO MUCH more and look much cleaner than the rack holding your brooms/mops etc. They can hold all that plus, strollers, scooters, car seats, Cozy Coupe cars, folding chairs, extension cords, ladders, you name it. Once I found these, I had nothing left on my garage floor.
I’m visiting from over at iheartorganizing and I’m wondering what’s in those little bottles-looks like glitter or something-on the peg board in spice rack type bins? And what’s in those cute spice containers that are magnetic on your metal strip? Thanks!!
Brandi, the spice containers on the wall have nails in them and the ones attached to the metal pegboard have drywall anchors and chair pads. Hope that helps!
[…] no master organizer like my friend Kathryn, but I’ll share the tools that we use to keep the mess supplies under a bit of […]
[…] through the house. The kids’ bathrooms, the laundry room, the family room, the office, the garage, the closets (oh yes, those too) – always putting our master bath dreams on the back burner. […]
[…] The kids’ bathrooms, the laundry room, the family room, the office, the garage, the closets (oh yes, those too) – always putting our master bath dreams on the back […]